Orphrey Bands for Altar Frontal
Yes, it is true. The Ecclesiastical Sewing workroom is gone. There is nothing there at the moment except an empty room, with carpet badly soiled from construction dust and dirt. Gone is the cutting table and sewing table, the book-case and the vintage books, the fabrics and trims. It is an odd feeling to have what was an organized workroom completely disassembled.
There is a bit of construction going on, both upstairs and down, and it should wrap up in one more week! And then it will be exciting to reestablish the Ecclesiastical Sewing workroom in a brand new space! In the mean time, the dining table has become a sewing and cutting work table.
There are some big events looming in the near future. The first and most important is Christmas. There is a new altar hanging set in the works but the construction mess and delays with the photo shoot, the project is being planned for Christmas 2016. Yes, that is right! Christmas 2016. As in retail, some church vestment projects will be in the works for a year ahead of time. I have several designs off at the moment being digitized for the 2016 Christmas season. As those new designs progress, I will be sure to let you know so you have plenty of time to plan ahead for next year’s Christmas celebrations.
The second big event is a family wedding over New Year’s weekend. And with any luck, the altar hangings (minus the embroidery designs) will be ready for the Wedding over New Year’s Weekend.
Here is a sneak peek at one of the fabrics being used for the wedding altar frontal.

The Orphrey bands for the altar frontal will be cut from St. Hubert Gold/Gold. St. Hubert is a brocatelle Ecclesiastical Fabric originally designed Sir Ninian Comper and produced by M. Perkins and Sons circa 1890. The fabric will be available on our new website shortly after the first of the year in several color ways, including Red/Gold, White/Gold, Blue/Gold, Black/Gold, and Gold/Gold as in the above photo. St. Hubert is one of my favorite go to ecclesiastical fabrics. It cuts up well for use in orphrey bands. The above orphrey bands are approximately 7″ wide prior to adding any trims. For an altar frontal, this can be a nice width for an orphrey band (depending on the altar size).
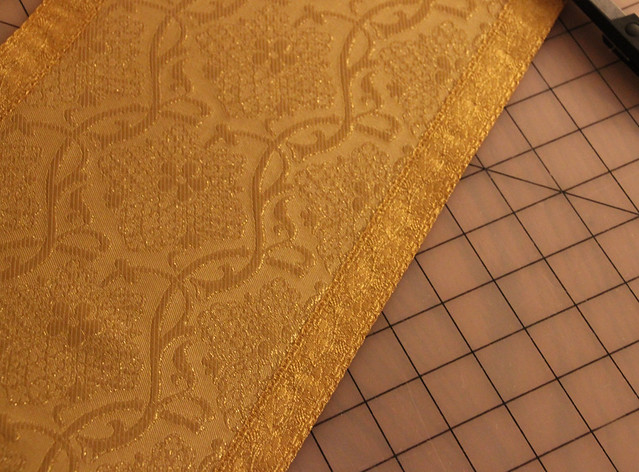
St. Hubert has a linear design motif consisting of this floral motif surrounded by vines on either side. The piece is cut using the selvage as one edge, and finding the identical motif on the opposite side of the vine to use as a cutting line. Once the orphrey band is cut, the edges are surged to provide a clean finish. Surging the edges of the orphrey bands can on occasion cause the fabric to bunch or pucker. Taking each piece and starting in the center, smooth the stitching, first to one end, and then to the opposite end until the fabric lies flat and smooth. Next, it is off to the ironing board to again make sure the fabric is smooth and flat. When everything looks good as in the first photo above, it is time to stitch the galloon to the orphrey.
This is where things can become challenging, or things can go smooth as “silk.” When sewing the galloon trim to an orphrey band, it can be a challenge to keep both layers smooth and flat so they feed evenly through the sewing machine. Much comes from feel and experience. Using a walking foot or even feed foot can help keep the layers of fabric and trim even.
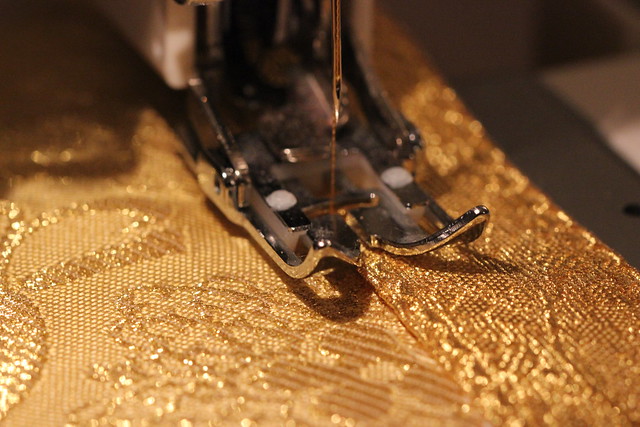
I do not use pins, but others may find using pins is helpful. If you use pins, start at the center of each orphrey and pin to each end. Ease the trim to the fabric. Things will shift and move as you sew. It will be necessary to adjust as you go along. The trick is to keep the base fabric taunt and ease the galloon trim to the base fabric. Pulling the galloon trim taunt on the base fabric will result in puckers.
Still others may find the use of a spray adhesive helpful. I prefer not to use adhesive sprays very often, and limit their applications. I have used things like the 1/4″ fusible web, and for me it created a puckered mess.
The oak leaf galloon is a heavy metallic trim which is difficult to ease to a base fabric. Because of this stiffness which comes from the metallic fibers used to create the trim, it is not as susceptible to drawing up as are lighter weight galloons. Before launching into using the expensive ecclesiastical braids and trims, it might be worth while to purchase a variety of heavier ribbon trims from a local fabric store and practice with those on fabric scraps.
Just as was done on the small orphrey bands used for making stoles, I prefer to apply the galloon to either side of the orphrey to create a finished band. Then the finished band is applied to the final project.
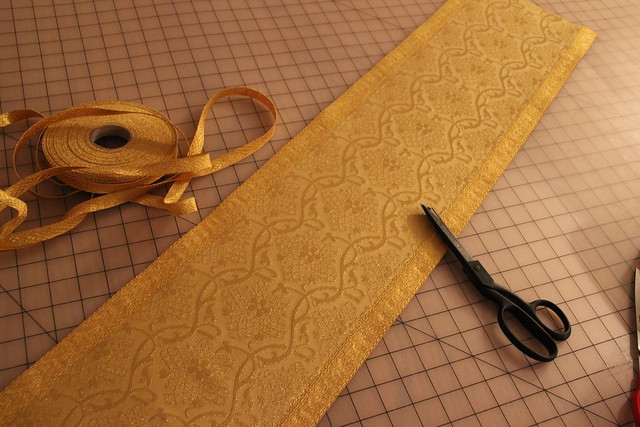
If all is done correctly, the end result should look like the above orphrey band. The motif is perfectly centered, the galloon trim is applied smooth and is straight, and the orphrey band is pucker free. These same techniques would be employed when making orphrey bands for a chasuble as well. The difference between the bands for an altar frontal and a chasuble might be in the width of the orphrey. A “Y” orphrey might be slightly narrower, while a single column orphrey might be the same width, or slightly wider.
Now please, don’t expect perfection the first time you try applying galloon to long orphrey bands. Start with smaller orphrey bands like those used on stoles to get the feel of the process. Then slowly work your way to the larger projects. My first attempts at making orphrey bands for altar frontals were nothing short of a disaster. But with time and practice, they have improved.
Soli Deo Gloria
Filed under: Ecclesiastical Sewing Tagged: Church Vestment, Ecclesiastical Fabric, Ecclesiastical Sewing, Galloon trim, Orphrey bands, Sir Ninian Comper, St. Hubert fabric


0 comments